On completion of this stage you should be familiar with the following concepts:
|
Modeling notions: |
Constant |
|
Modeling techniques: |
Creating a drop-down list (chooser) Updating a table structure |
|
Useful display templates: |
Row, Chooser |
In this stage you will model the addition of a field to an existing data structure (and the corresponding database table). The new field will have a predefined set of possible values, which the user can choose from a drop-down list.
This stage’s modeling should be performed in the Tutorial 4-5 project, you imported at the end of the previous stage.
We want to enable the employee to distinguish urgent requisitions from regular one.
To do so, let’s add an Urgency field to the requisition, which can have two possible values – Regular and Urgent. This is implemented using a Chooser display element which allows users to select from a list of predefined values.
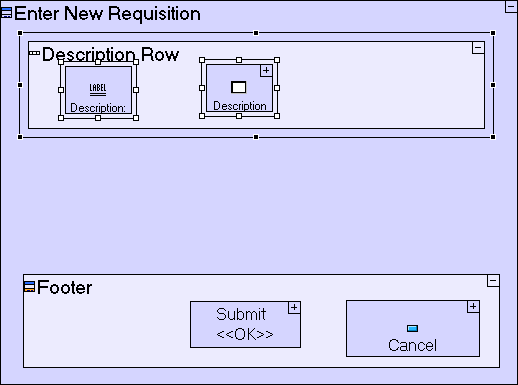
Let’s take a look at the Enter New Requisition popup, which has been updated in the model imported on completion of the previous stage:
Note that the Description text area and label have been moved into a Row display element named Description Row. This causes the popup to look neater, by ensuring the elements inside the row will always appear together in the same row.
We would like the Urgency chooser we are about to add, to be positioned in its own Row:
Zoom into the Enter New Requisition popup.
Select the Display/Row template (![]() ),
and drag it into Enter New Requisition, below Description
Row.
),
and drag it into Enter New Requisition, below Description
Row.
Name it Urgency Row.
Next, we shall add the Chooser itself (plus a label):
Zoom into the Urgency Row.
Select the Display/Label template (![]() ),
and drag it into Urgency Row.
Name it Urgency:.
),
and drag it into Urgency Row.
Name it Urgency:.
Select the Display/Chooser
template (![]() ),
and drag it into Urgency Row.
Name it Urgency.
),
and drag it into Urgency Row.
Name it Urgency.
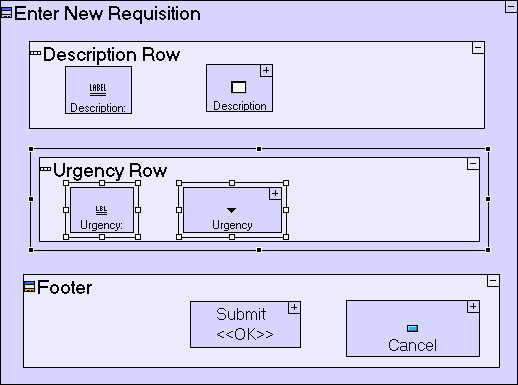
The model should now look as follows:
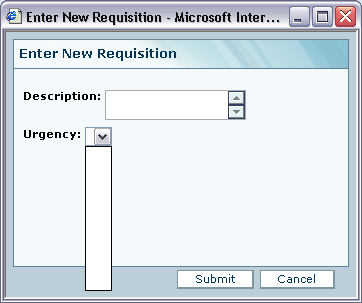
If you now save your work, run the application and press the New Requisition button, you should see the row you've just modeled, which includes an empty drop down list (chooser), as in the following screen shot:
To specify the possible values for Urgency, we’ll need an initialization process in the Enter New Requisition popup. The initialization process will run each time the Enter New Requisition popup is opened and will populate the Urgency drop down list with the possible values to choose from:
Select the Basic/Action
template (![]() ),
and drag it into Enter New
Requisition; Name it Initialize Urgency
Chooser.
),
and drag it into Enter New
Requisition; Name it Initialize Urgency
Chooser.
Zoom into Initialize Urgency Chooser.
The process must include a reference to the Urgency chooser display element, which is part of the Enter New Requisition popup:
Right-click on the Initialize
Urgency Chooser process, select Add
Ancestor Reference from the menu, and select
![]() Enter New Requisition.
Enter New Requisition.
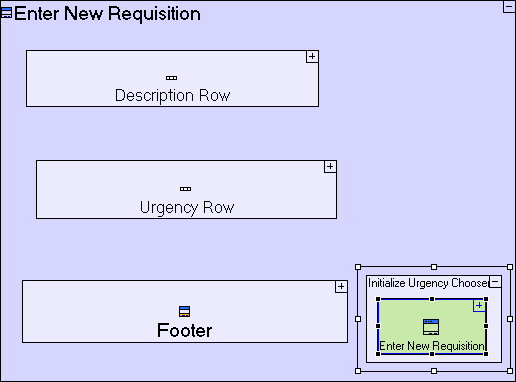
The model should now look as follows:
Since there are only 2, pre-defined urgency values we wish to use, we can define those using Constants (which are data elements with a predefined fixed value).
Select the Constants/Text
template (![]() ),
and drag it into Initialize
Urgency Chooser; Name it Regular.
),
and drag it into Initialize
Urgency Chooser; Name it Regular.
Notice that the Regular
data element we have just added is displayed as “Regular”
instead of Regular. This indicates it is a Constant.
“Regular” is a
textual constant (a string of characters). There are also numeric
constants, date constants, etc.
Values for a chooser need not necessarily be defined using constants. The values may also come from any other data source, such as the result of a previous process, a database table or a spreadsheet.
Now flow is needed to indicate the constant should populate the chooser:
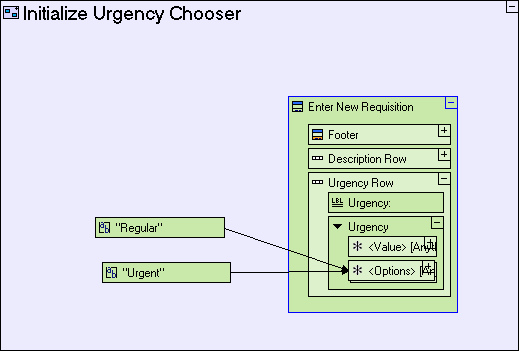
Create a flow from the “Regular” constant to Enter New Requisition/Urgency Row/Urgency/<Options>.
To specify a second possible value of the chooser Urgency:
Select the Constants/Text
template (![]() ),
and drag it into Initialize
Urgency Chooser; Name it Urgent.
),
and drag it into Initialize
Urgency Chooser; Name it Urgent.
Create a flow from the “Urgent” constant to Enter New Requisition/Urgency Row/Urgency/<Options>.
The Initialize Urgency Chooser model should look similar to the following:
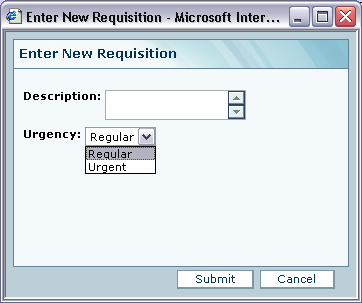
If you now save your work and run the application, the drop down list in the Enter New Requisition popup should allow you to choose between the two possible values Regular and Urgent, as in the following screenshot:
The Urgency chooser now appears in the display, but the entered value is not saved with the requisition. We should also model the addition of the Urgency field to the Requisition database record.
Zoom to the Requisition database record in Footer/Submit.
Select the Data
Types/Text template (![]() )
and drop it into Requisition.
Name it Urgency.
)
and drop it into Requisition.
Name it Urgency.
Note that as the Requisition database record is reused in 2 models (Submit and Requisition List), you can actually perform the above steps in Requisition List/Requisition, with the same effect. In any case, the change will affect both.
Next, add a Flow to populate the Urgency field in the Requisition data structure with the value the user selected in the chooser:
Zoom to the Submit button in Footer.
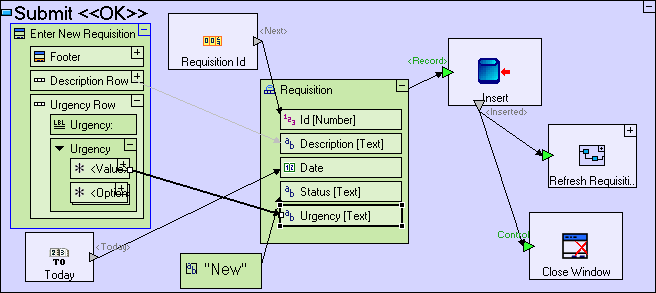
Create a flow from Enter New Requisition/Urgency Row/Urgency/<Value> to Requisition/Urgency.
The Chooser has 2 predefined data elements, <Options> and <Value>. <Options> contains the values appearing in the chooser (which is why it is a repetitive element). <Value> contains the currently selected value.
The modeling we’ve performed in this last step should look similar to the following:
If you now save your work, and launch your application in the browser, it should look as follows:

Without doing any additional modeling on the Requisition List table model, it now displays an Urgency column. This is because the Requisition database record is reused in the Requisition List model. And since the Requisition database record defines the actual structure of the database table, the structure of the Requisitions table in the database is also updated with a new field, Urgency.
Records that existed in the database before the addition of the Urgency field will have a NULL value, and will be displayed as an empty value as can be seen in the screen shot above.
Import the sample project Tutorial 5-6 and use it as the basis for the next stage of the tutorial.
For a reminder on how to import a sample project, see the Importing a Sample Project section at the end of Stage 2.
This sample project contains all the functionality modeled thus far.
You may now proceed to Stage 6, in which we shall model the next stage in a requisition's lifecycle, the approval of the requisition by the employee’s manager.
Click here to open the live project in a separate window.